 View on GitHub
Modeling and Binding
This guide will walk you through a practical example of taking an app spec/design and turning it into a working IGListKit project.
You will learn how to:
- Turn a design spec into a top-level model and view models
- Use
ListBindingSectionControllerfor animated, one-way cell updates - Cell-to-controller action handling and delegation
- Updating the UI with local data mutations
Getting Started
You can follow along and build the example in this guide. First, you must download this starter project. Open ModelingAndBinding-Starter/ModelingAndBinding.xcworkspace since the base project is setup with CocoaPods with IGListKit already added as a dependency.
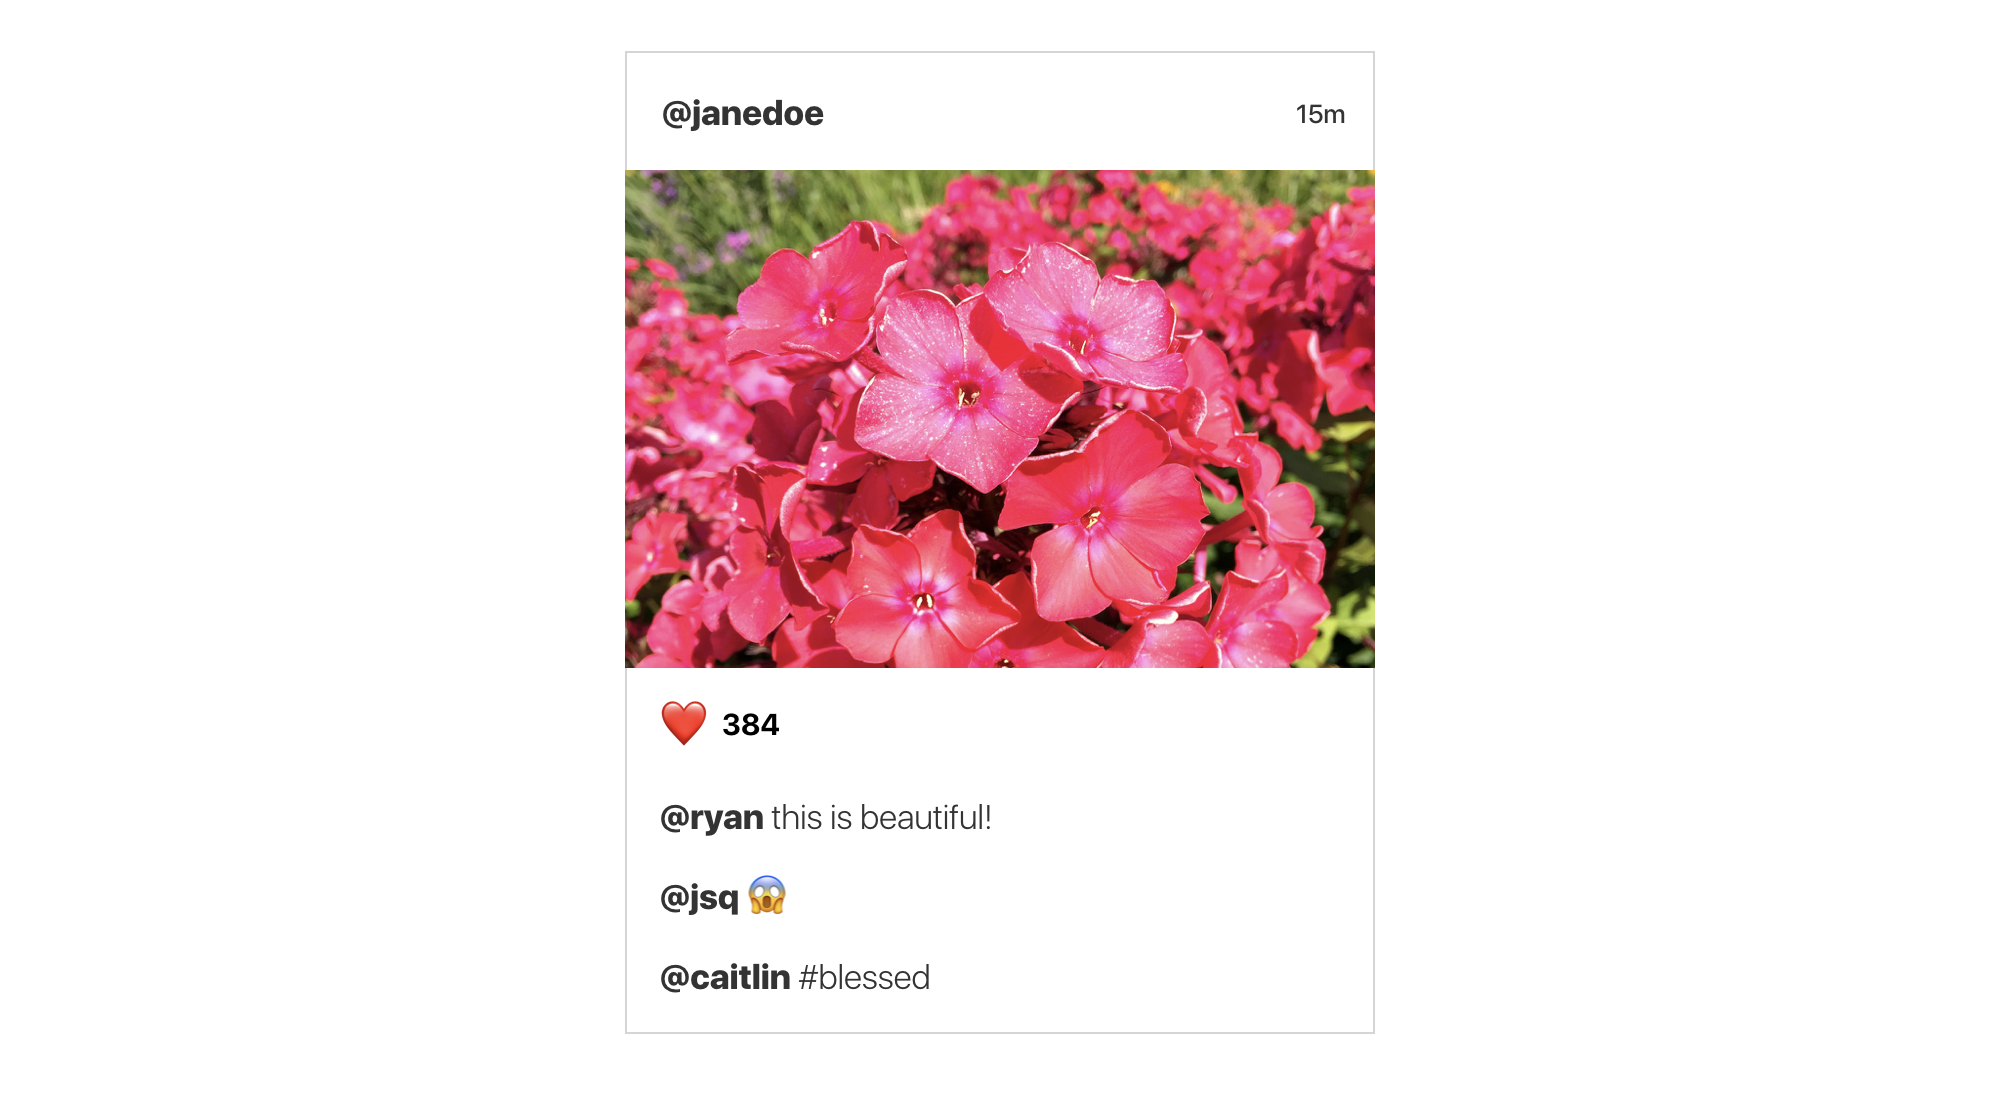
Take a look at the following Instagram-inspired list element design:
You can already start mentally modelling your data:
- The top cell has a username and timestamp label
- The image cell will need some sort of image
URL - An action cell with like count. There will also need to be some sort of action handling when someone taps the heart
- Then there are a dynamic number of comment cells that contain a username and comment
Remember that IGListKit functions on one model per section controller. All of the cells in this design correlate to one top-level “post” object delivered by a server. You want to create a Post model that contains all of the information that the cells require.
A common mistake is to create a single model and section controller for a single cell. In this example, that will create a very confusing architecture since the top-level objects will contain a mix and match of user, image, action, and comment models.
Creating Models
Create a new file named Post.swift in the starter project:
import IGListKit

final class Post: ListDiffable {

  // 1
  let username: String
  let timestamp: String
  let imageURL: URL
  let likes: Int
  let comments: [Comment]

  // 2
  init(username: String, timestamp: String, imageURL: URL, likes: Int, comments: [Comment]) {
    self.username = username
    self.timestamp = timestamp
    self.imageURL = imageURL
    self.likes = likes
    self.comments = comments
  }

}
- It’s best practice to always declare your values as
letso they cannot be mutated again. The compiler will complain about theCommentmodel, ignore that for now.
Since
SinceIGListKit is compatible with Objective-C, your models must be classes which means writing initializers. It’s only a little copy & paste!
Now add a ListDiffable implementation inside of Post:
// MARK: ListDiffable

func diffIdentifier() -> NSObjectProtocol {
  // 1
  return (username + timestamp) as NSObjectProtocol
}

// 2
func isEqual(toDiffableObject object: ListDiffable?) -> Bool {
  return true
}
- Derive a unique identifier for each post. Since a single post should never have the same
usernameandtimestampcombo, we can start with that. - A core requirement to using
ListBindingSectionControlleris that if two models have the samediffIdentifier, they must be equal so that the section controller can then compare view models.
View Models
Create a new Swift file named Comment.swift and try writing the Comment model yourself:
usernameof typeStringtextof typeString- You will be diffing this model eventually, so add a
ListDiffableimplementation
If you get stuck, or just want to copy & paste, you can reveal the implementation below.
Comment implementation
“`swift import IGListKit final class Comment: ListDiffable { let username: String let text: String init(username: String, text: String) { self.username = username self.text = text } // MARK: ListDiffable func diffIdentifier() -> NSObjectProtocol { return (username + text) as NSObjectProtocol } func isEqual(toDiffableObject object: ListDiffable?) -> Bool { return true } } ”` A note on the `isEqual(toDiffableObject:)` implementation: Whatever you use to derive the `diffIdentifier` can be omitted from any equality checks, since by definition the objects have already matched on their identifiers. In this case, the `username` and `text` **must be equal** by the time two objects are checked for equality.
Using the Comment array on a Post should make some sense: there are a dynamic number of comments on each post. For each comment, you want to display a cell.
What might be a little bit of a new concept, though, is that you need to create models for the UserCell, ImageCell, and ActionCell as well when working with ListBindingSectionController.
A binding section controller is almost like a mini-
IGListKit. It takes an array of view models and turns them into configured cells. Get into the habit of creating a new model for each cell type within anListBindingSectionControllerinstance.
With that in mind, let’s start with the model for the UserCell:
Create a new Swift file called UserViewModel.swift:
import IGListKit

final class UserViewModel: ListDiffable {

  let username: String
  let timestamp: String

  init(username: String, timestamp: String) {
    self.username = username
    self.timestamp = timestamp
  }

  // MARK: ListDiffable

  func diffIdentifier() -> NSObjectProtocol {
    // 1
    return "user" as NSObjectProtocol
  }

  func isEqual(toDiffableObject object: ListDiffable?) -> Bool {
    // 2
    guard let object = object as? UserViewModel else  { return false }
    return username == object.username
    && timestamp == object.timestamp
  }

}
- It’s important to write a good equality method for these view models. Anytime something changes, forcing the models to not be equal, the cell will be refreshed.
Since
Since there will only be oneUserViewModel per Post, you can hardcode an identifier. This will enforce only a single model & cell being used.
Try to make view models for the image and action cell. Remember there is only a single cell per Post, so you can use UserViewModel as a starting point for how the models should look.
View model implementations
“`swift import IGListKit final class ImageViewModel: ListDiffable { let url: URL init(url: URL) { self.url = url } // MARK: ListDiffable func diffIdentifier() -> NSObjectProtocol { return "image” as NSObjectProtocol } func isEqual(toDiffableObject object: ListDiffable?) -> Bool { guard let object = object as? ImageViewModel else { return false } return url == object.url } } final class ActionViewModel: ListDiffable { let likes: Int init(likes: Int) { self.likes = likes } // MARK: ListDiffable func diffIdentifier() -> NSObjectProtocol { return “action” as NSObjectProtocol } func isEqual(toDiffableObject object: ListDiffable?) -> Bool { guard let object = object as? ActionViewModel else { return false } return likes == object.likes } } “` > You could try getting away with using generics since these models look so similar, but we’ve found that using **simple** models makes long-term maintenance more manageable.
Using ListBindingSectionController
You now have the following view models, which can all be derived from each Post:
UserViewModelImageViewModelActionViewModelComment
Let’s start using these models to power cells using ListBindingSectionController. This controller takes a top-level model (Post), asks its data source for an array of diffable view models (our view models above), then binds those view models to cells (provided in the starter project).
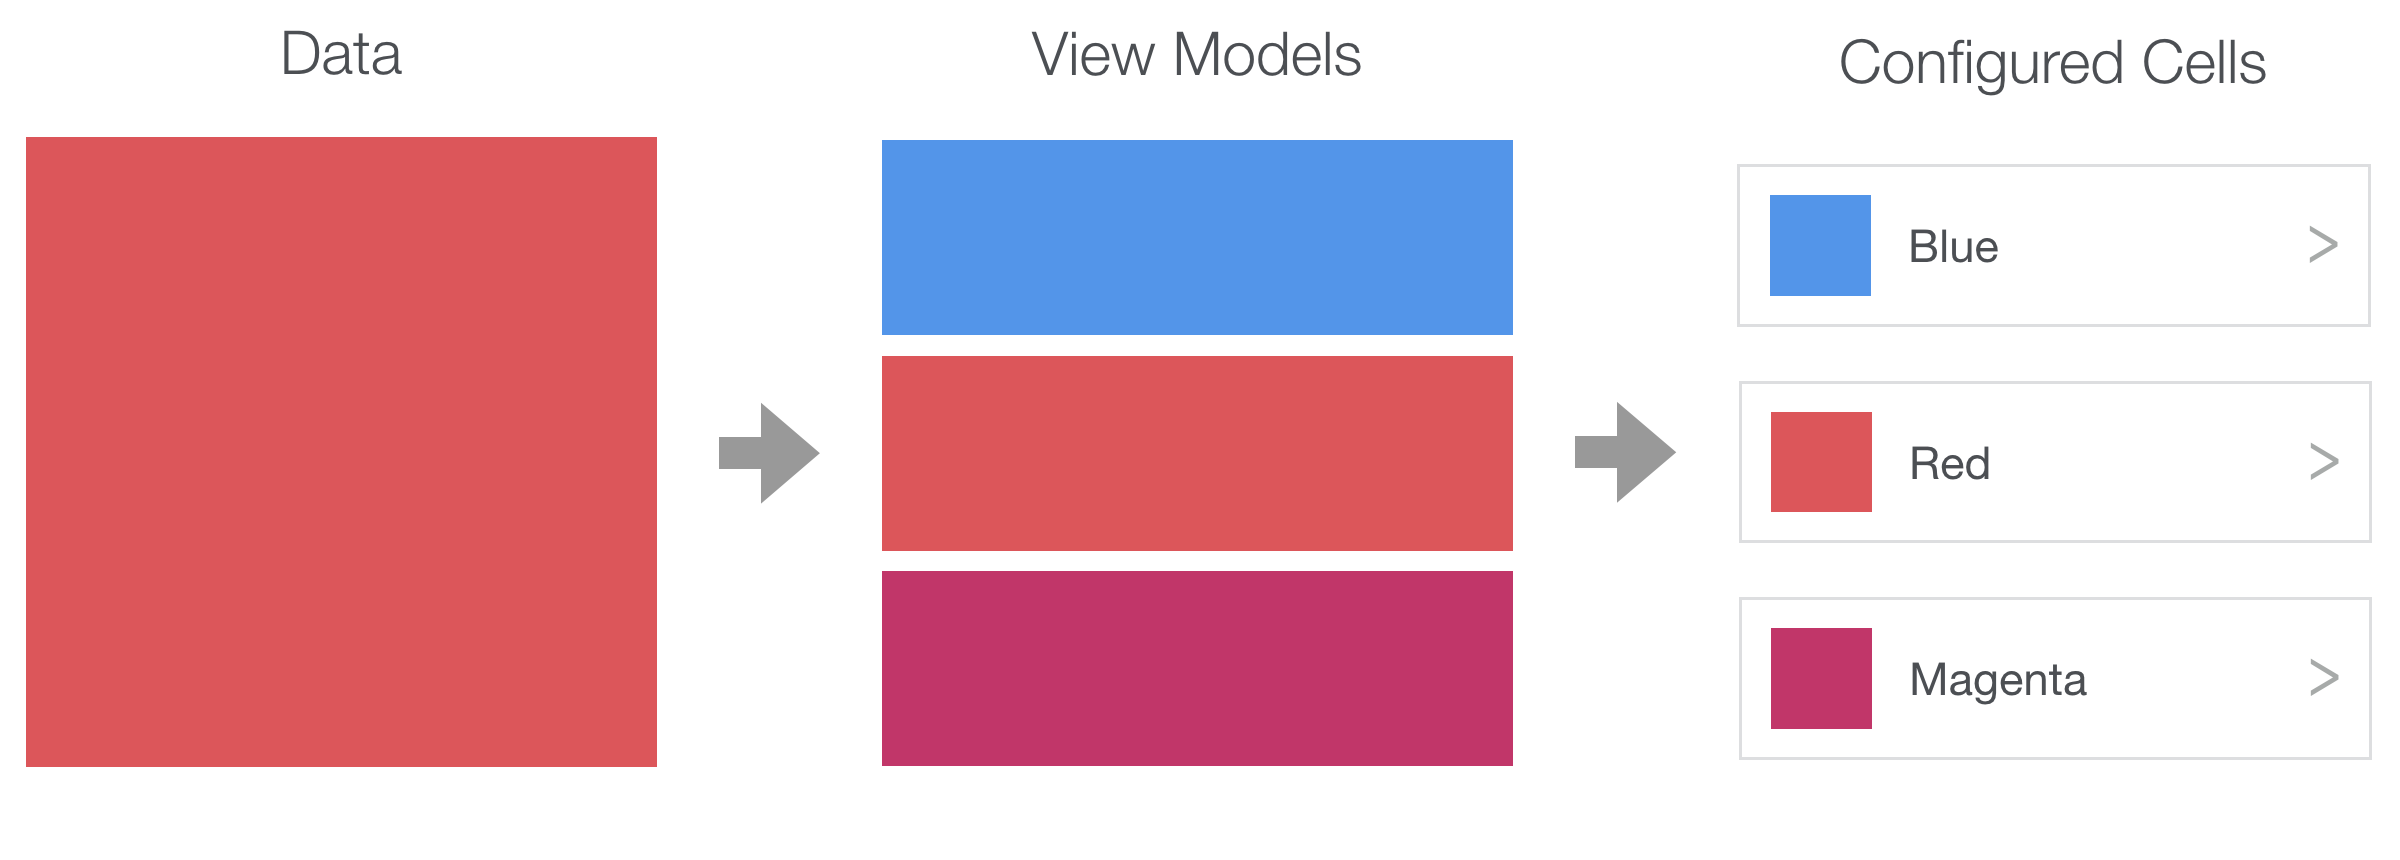
Create PostSectionController.swift and add the following code:
final class PostSectionController: ListBindingSectionController<Post>,
ListBindingSectionControllerDataSource {

  override init() {
    super.init()
    dataSource = self
  }

}
Notice that you are subclassing ListBindingSectionController<Post>. This declares your section controller as receiving a Post model. That way you don’t have to do any special casting of your model.
There are 3 methods that are required to satisfy the data source protocol:
- Return an array of view models given the top-level model (
Post) - Return a size for a given view model
- Return a cell for a given view model
First take care of the Post-to-view-models transformation:
// MARK: ListBindingSectionControllerDataSource

func sectionController(
  _ sectionController: ListBindingSectionController<ListDiffable>,
  viewModelsFor object: Any
  ) -> [ListDiffable] {
    // 1
    guard let object = object as? Post else { fatalError() }
    // 2
    let results: [ListDiffable] = [
      UserViewModel(username: object.username, timestamp: object.timestamp),
      ImageViewModel(url: object.imageURL),
      ActionViewModel(likes: object.likes)
    ]
    // 3
    return results + object.comments
}
- The
objectproperty must be optional because it will not exist upon section controller initialization. However, it should never be nil at this point, nor should theobject: Anyparameter be anything but the section controller type. This is a limitation of Objective-C generics and protocols, so doing afatalError()here is appropriate. - Create your array of view models by decomposing the
Postmodel into smaller models. - You can even append dynamic models that are delivered from the server.
Next add the required API to return a size for each view model:
func sectionController(
  _ sectionController: ListBindingSectionController<ListDiffable>,
  sizeForViewModel viewModel: Any,
  at index: Int
  ) -> CGSize {
  // 1
  guard let width = collectionContext?.containerSize.width else { fatalError() }
  // 2
  let height: CGFloat
  switch viewModel {
  case is ImageViewModel: height = 250
  case is Comment: height = 35
  // 3
  default: height = 55
  }
  return CGSize(width: width, height: height)
}
- Just like the
objectproperty, thecollectionContextshould never benil, but it’s a weakly referenced object so must be declared as optional. Again, usefatalError()to catch any critical failures. - Swift makes checking for types so easy! Just
switchon the type and assign a height. In Objective-C you should useisKindOfClass:. - Both the
UserViewModelandActionViewModelshare the same height of55pts according to the design.
Lastly, implement the API that returns a cell for each view model. This should look similar to the size API above. Give it a try yourself.
Remember that the cells are defined in Main.storyboard. You can click on each cell to view their identifiers.
"cellForViewModel:” implementation
“`swift
func sectionController(
_ sectionController: ListBindingSectionController
Binding Models to Cells
Now you have PostSectionController setup to create view models, sizes, and cells. The last piece to using ListBindingSectionController is having your cells to receive its assigned view model and configure itself.
This is done by making your cells conform to ListBindable. With that, ListBindingSectionController will automatically bind view models to each cell!
Open ImageCell.swift and change the implementation to look like the following:
import UIKit
import SDWebImage
// 1
import IGListKit

// 2
final class ImageCell: UICollectionViewCell, ListBindable {

  @IBOutlet weak var imageView: UIImageView!

  // MARK: ListBindable

  func bindViewModel(_ viewModel: Any) {
    // 3
    guard let viewModel = viewModel as? ImageViewModel else { return }
    // 4
    imageView.sd_setImage(with: viewModel.url)
  }

}
- Make sure to import
IGListKit! - Have the cell conform to
ListBindable - Guard against the view model type. This will always be what
PostSectionControllerpairs the cell with incellForViewModel:, but guard to be safe. - Use the SDWebImage library to set the image URL.
Now do exactly the same thing for each of the other cells:
ActionCellbindsActionViewModelUserCellbindsUserViewModelCommentCellbindsComment
ListBindable implementations
”`swift final class ActionCell: UICollectionViewCell, ListBindable { @IBOutlet weak var likesLabel: UILabel! @IBOutlet weak var likeButton: UIButton! // MARK: ListBindable func bindViewModel(_ viewModel: Any) { guard let viewModel = viewModel as? ActionViewModel else { return } likesLabel.text = “\(viewModel.likes)” } } final class UserCell: UICollectionViewCell, ListBindable { @IBOutlet weak var usernameLabel: UILabel! @IBOutlet weak var dateLabel: UILabel! // MARK: ListBindable func bindViewModel(_ viewModel: Any) { guard let viewModel = viewModel as? UserViewModel else { return } usernameLabel.text = viewModel.username dateLabel.text = viewModel.timestamp } } final class CommentCell: UICollectionViewCell, ListBindable { @IBOutlet weak var usernameLabel: UILabel! @IBOutlet weak var commentLabel: UILabel! // MARK: ListBindable func bindViewModel(_ viewModel: Any) { guard let viewModel = viewModel as? Comment else { return } usernameLabel.text = viewModel.username commentLabel.text = viewModel.text } } “`
Displaying in the View Controller
The very last step is getting the PostSectionController displaying in the app’s list.
Go back to ViewController.swift and add the following to viewDidLoad(), before setting the dataSource or collectionView:
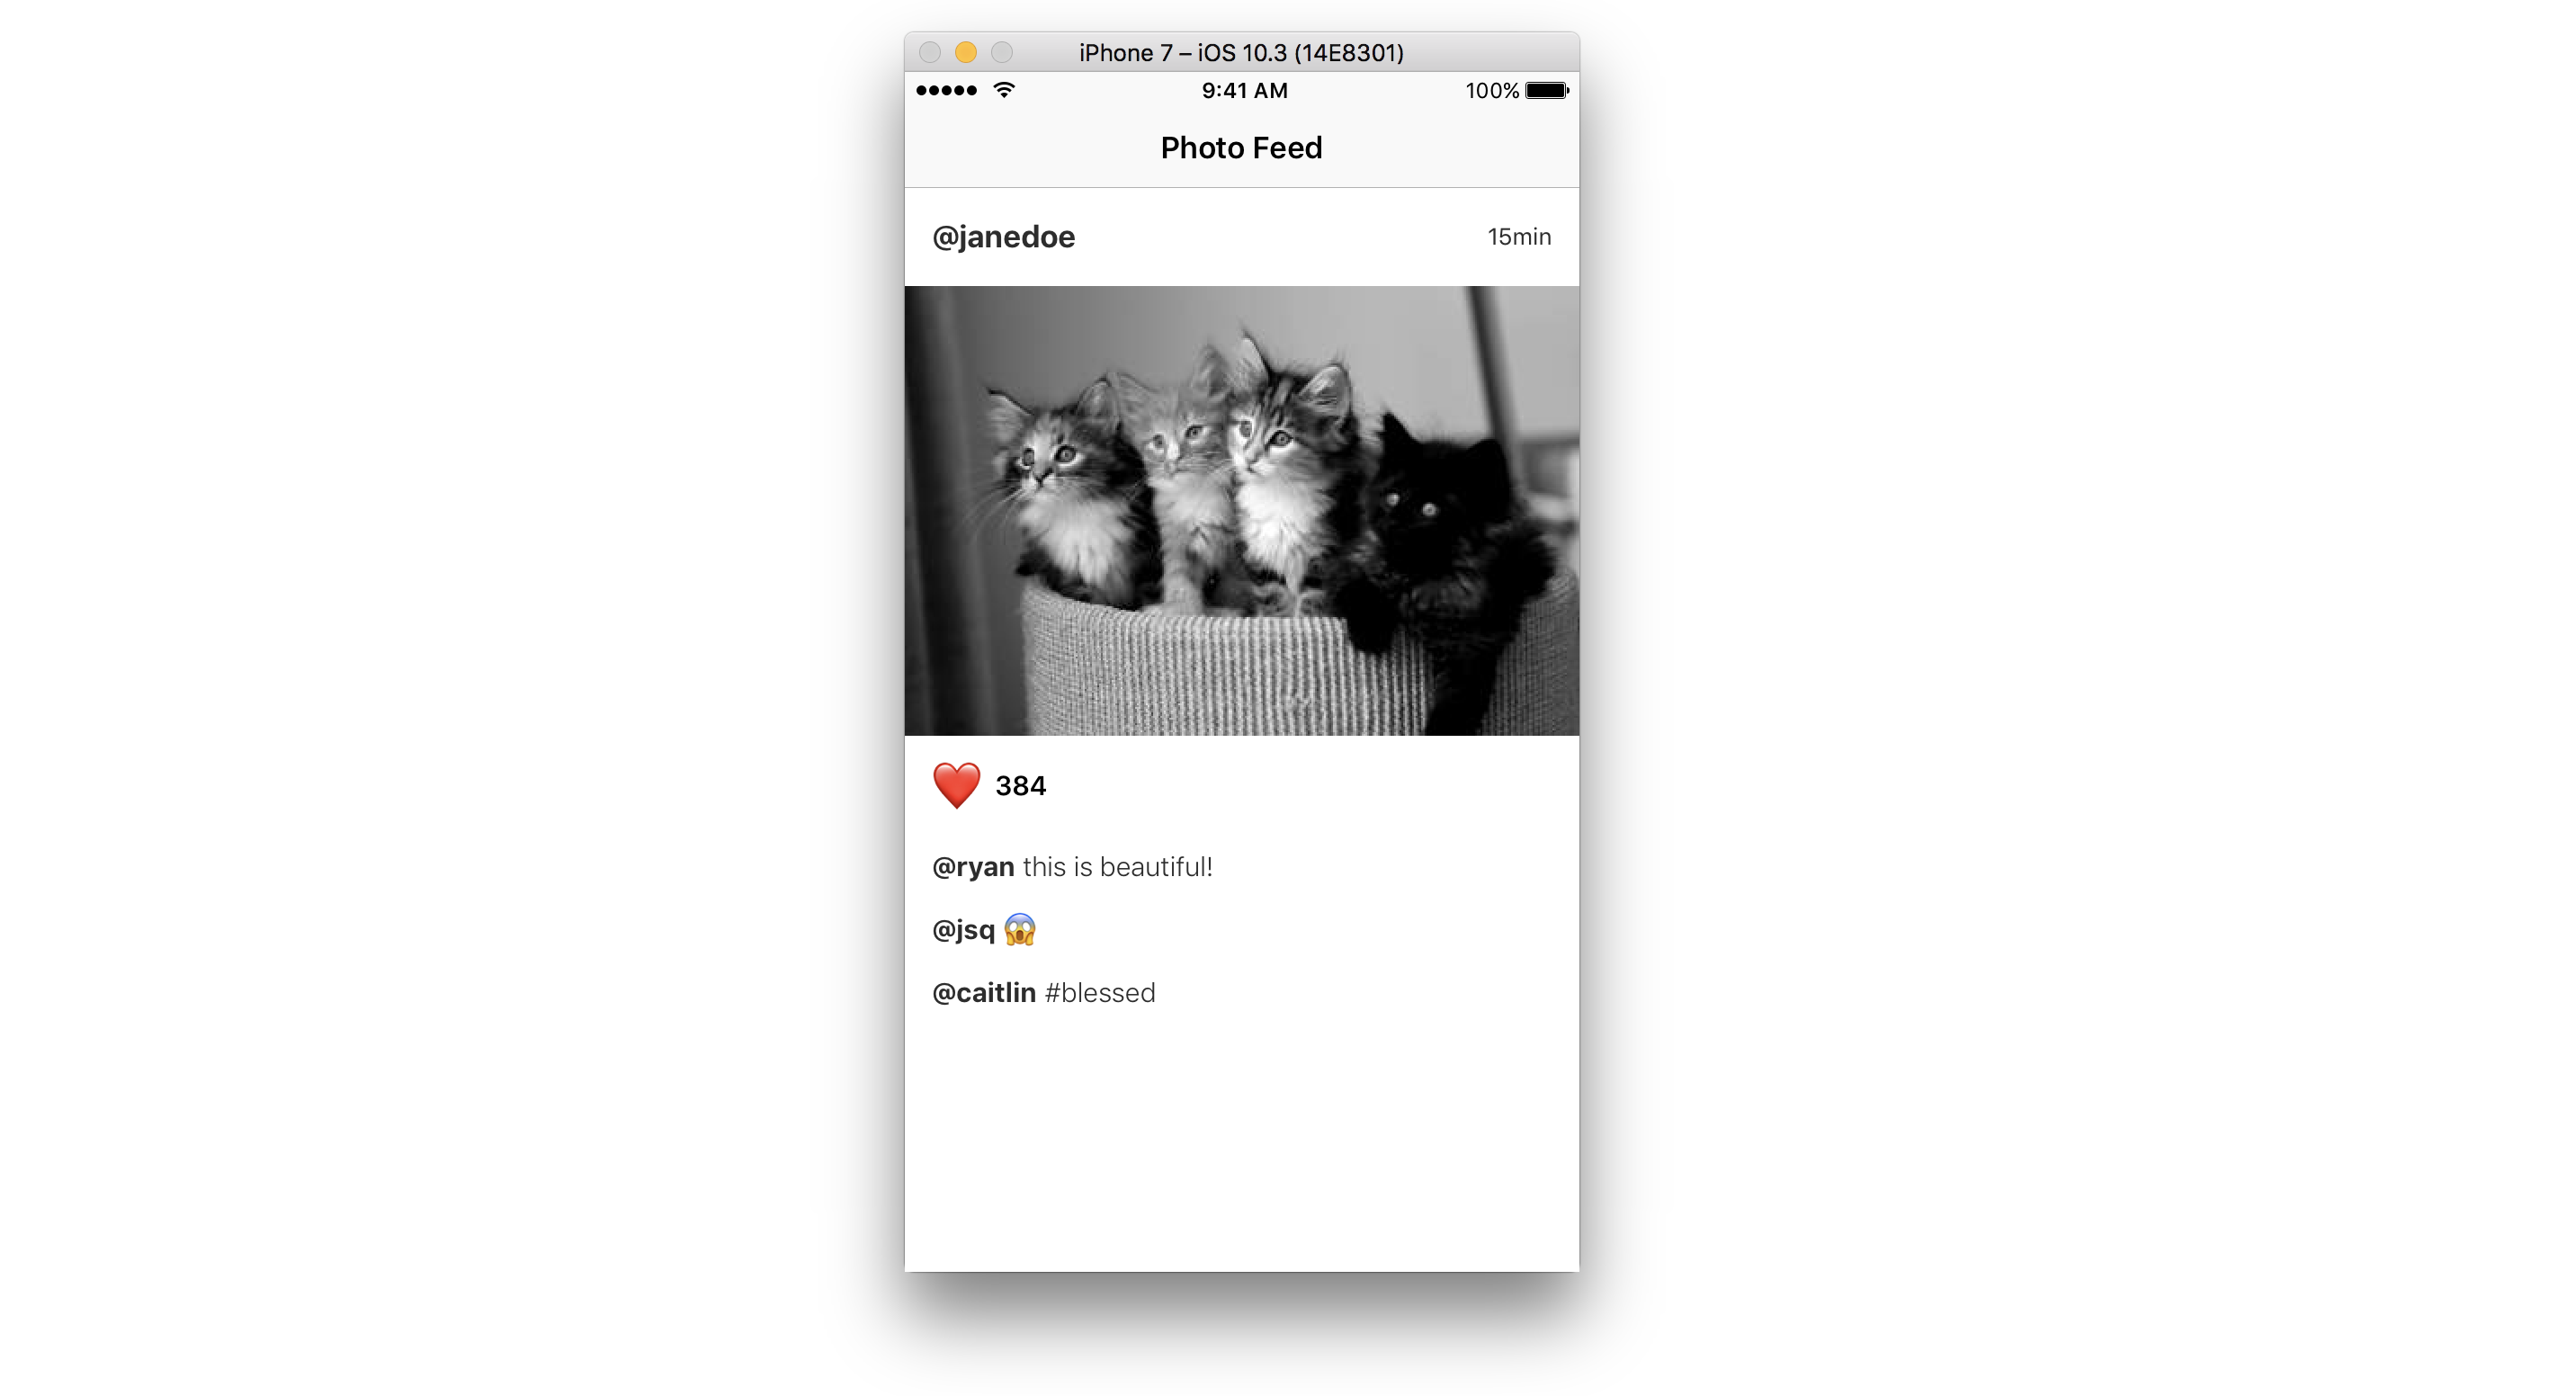
data.append(Post(
  username: "@janedoe",
  timestamp: "15min",
  imageURL: URL(string: "https://placekitten.com/g/375/250")!,
  likes: 384,
  comments: [
    Comment(username: "@ryan", text: "this is beautiful!"),
    Comment(username: "@jsq", text: "😱"),
    Comment(username: "@caitlin", text: "#blessed"),
  ]
))
Lastly, update listAdapter(_, sectionControllerFor object:):
func listAdapter(
  _ listAdapter: ListAdapter,
  sectionControllerFor object: Any
  ) -> ListSectionController {
  return PostSectionController()
}
Normally you’d want to check the type of
object, but since you’re only usingPostat this point, it’s safe to simply return a newPostSectionController.
Build and run the sample app to see your post show up!
Handling Cell Actions
This design should respond to tapping the heart icon on the ActionCell. In order to do that, you need to handle taps on the UIButton, then forward the event to the PostSectionController:
Open ActionCell.swift and add the following protocol:
protocol ActionCellDelegate: AnyObject {
  func didTapHeart(cell: ActionCell)
}
Add a new delegate variable to the ActionCell, beneath the outlets:
weak var delegate: ActionCellDelegate? = nil
Override awakeFromNib() and add a target & action to the likeButton:
override func awakeFromNib() {
  super.awakeFromNib()
  likeButton.addTarget(self, action: #selector(ActionCell.onHeart), for: .touchUpInside)
}
The last thing you need to do in ActionCell.swift is add an implementation for onHeart():
func onHeart() {
  delegate?.didTapHeart(cell: self)
}
This will forward the button tap outside of the cell and to the delegate.
Open PostSectionController.swift and update the cellForViewModel: method. Add the following at the end of the method, just after the guard and right before you return the cell:
if let cell = cell as? ActionCell {
  cell.delegate = self
}
The compiler will immediately complain. Satisfy the compiler but adding an empty implementation to PostSectionController:
final class PostSectionController: ListBindingSectionController<Post>,
ListBindingSectionControllerDataSource,
ActionCellDelegate {

//...

// MARK: ActionCellDelegate

func didTapHeart(cell: ActionCell) {
  print("like")
}
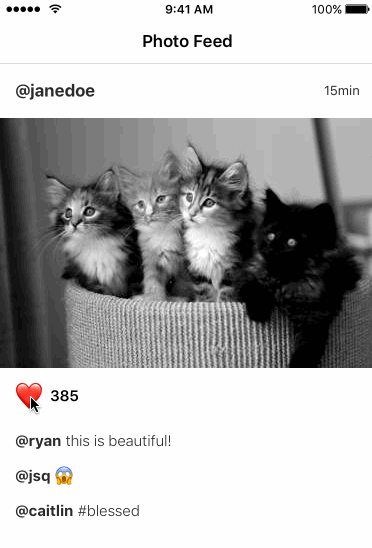
Build and run the app and tap on the heart button. You should see "like"s printing into the console.
Local Mutations
Every time someone taps the heart button, you need to add a new like to the Post. However, all of your models are declared with let because immutable models are a much safer design. But if everything is immutable, how do we mutate the like count?
The PostSectionController is the perfect place to handle and store mutations. Open PostSectionController.swift and add the following variable:
var localLikes: Int? = nil
Go back to the didTapHeart(cell:) delegate method and change the implementation to the following:
func didTapHeart(cell: ActionCell) {
  // 1
  localLikes = (localLikes ?? object?.likes ?? 0) + 1
  // 2
  update(animated: true)
}
- Mutate the
localLikesvariable using either the previouslocalLikesor starting withobject.likes, whichever exists. Fallback to0which will never happen, just satisfying the compiler. - Call the
update(animated:,completion:)API onListBindingSectionControllerto refresh the cells on the screen.
In order to actually send the mutations to the models, you need to start using localLikes with the ActionViewModel which is given to the ActionCell.
Still in PostSectionController.swift, find the cellForViewModel: API and change the ActionViewModel initialization to the following:
ActionViewModel(likes: localLikes ?? object.likes)
Build and run the app, tap on the heart button, and see your likes increment!
Wrapping up
If you got stuck at all, or just want to play around with the example, you can find the finished project here in ModelingAndBinding/ModelingAndBinding.xcworkspace.
ListBindingSectionController is one of the most powerful features that we’ve built for IGListKit because it further encourages you to design small, composable models, views, and controllers.
You can also use the section controller to handle any interactions, as well as deal with mutations, just like a controller should!
If you have suggestions for other topics you’d like to see, or want to offer a correction, please create a new issue!